

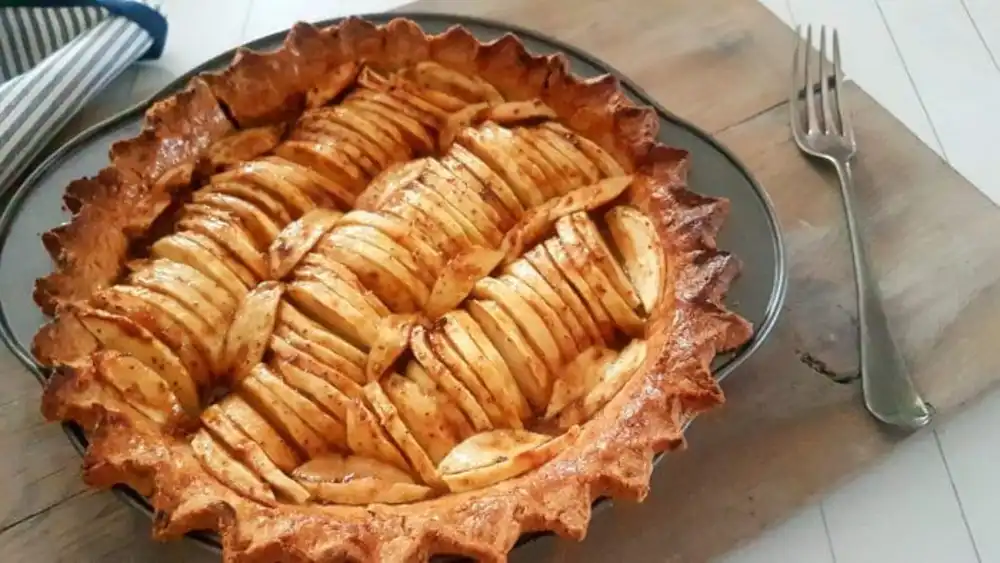
It’s apple pie season. It’s an American classic and arguably the most popular kind of dessert pie. I’ll never say no to a slice of apple pie. The pleasure I get from a forkful of flaky, buttery crust topped with soft and sweet cinnamon-scented, apples with a hint of lemon never gets old or tired. The rains finally paving the way for a tiny hint of winter and loads of apples at my local vegetable store, put me in the mood for some warm apple pie.
The idea of experimenting with a whole grain pie crust has been on my mind for some time. My last attempt at a whole wheat crust didn’t go as expected and I was left with a very crumbly dough that I struggled and finally failed to bind. Then I read Stella Parks’s (award-winning pastry chef and author of BraveTart) brilliant piece on whole wheat pie crusts on www.seriouseats.com; it renewed my resolve to try a whole grain crust one more time. Her unique techniques gave me the confidence to bake an apple pie with a whole wheat and oatmeal crust. I employed many of her tips and tricks but not all, since her instructions were for A whole wheat and AP flour crust while mine had whole wheat and oatmeal (less gluten and less pliability) worked. Not only did my pie turn out to be beautiful and delicious, I also ended up learning a few small but significant tweaks to improve my pie making.
Pointers to get your pie right
- Make sure all your ingredients – flours, butter, water are cold. Since I live by the sea with humidity being the enemy, I even chill my mixing bowl for 10 minutes before I begin.
- Cut the butter into cubes for easy mixing. It must be slightly yielding but not soft. You should be able to smash it with a little pressure from your thumb.
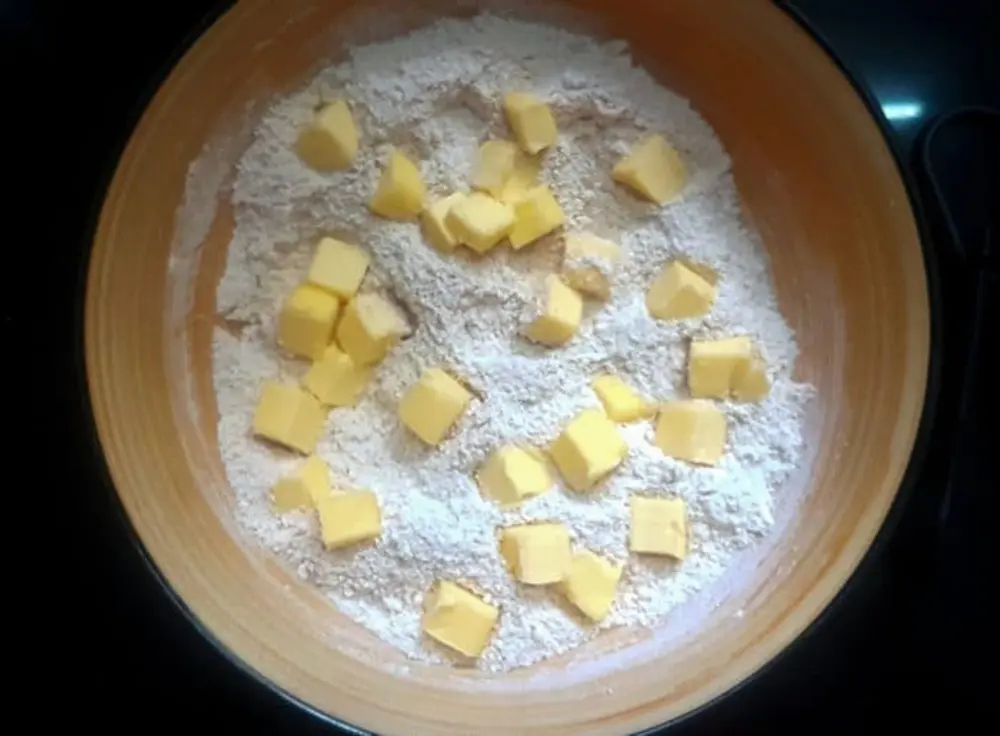
- Parks’s tip of pushing the butter with your thumb rather than the traditional way of rubbing it into the flour, is genius. This prevents body heat from transferring to the butter through the fingertips, keeping the temperature of the dough down. Also, the splats of butter in the dough swell up in the oven creating flaky layers.
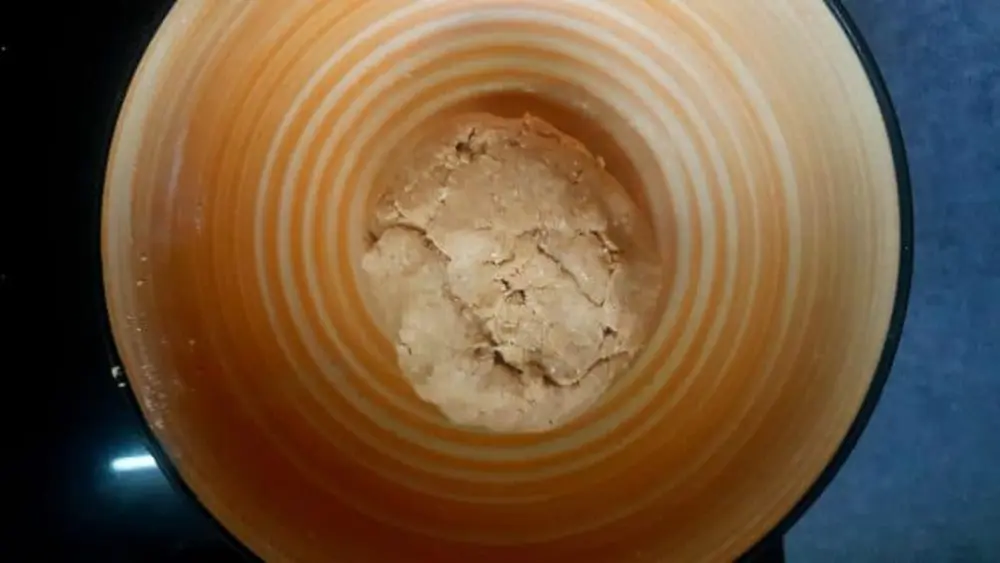
- Whole wheat pie crusts need more water than crusts made with regular all-purpose flour. So for 250g of flour I used as many as 6 tbsps of cold water. It should help bind the dough enough to allow for rolling. But be careful not to put too much water as it will yield a sticky dough.
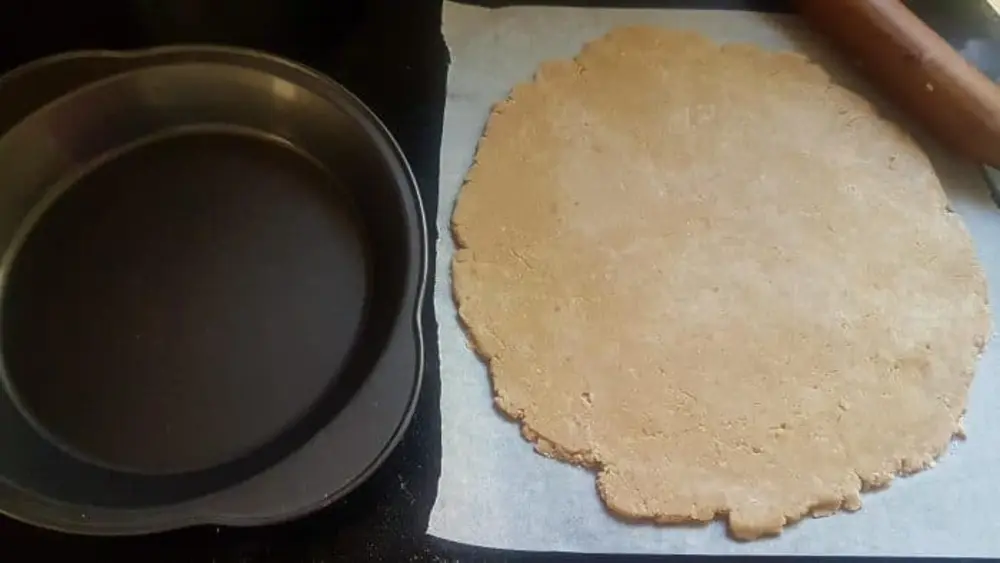
- I also took Park’s advice and rolled out the crust before chilling it for 2 hours. This helps the pie crust completely relax prior to baking. The traditional method requires the dough to be chilled for 30 minutes before rolling and shaping.
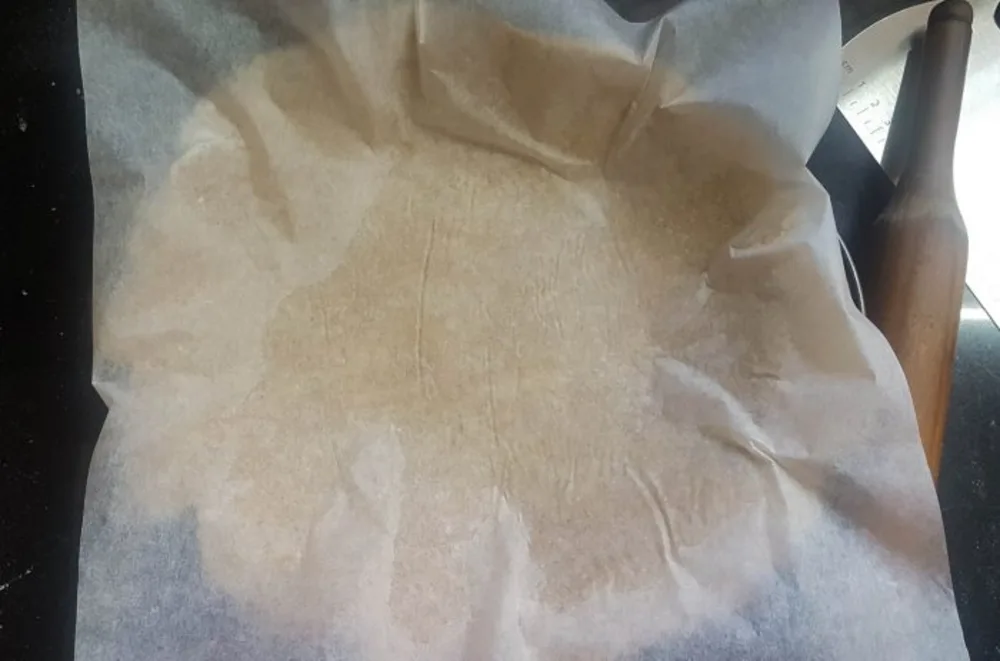
- Since a whole grain pie crust is more fragile, I rolled it out on baking parchment. So all I did to transfer it, was to place the pie dish upside down on the rolled-out dough and flip the parchment. Then I just gently tucked the crust to fit the dish and crimped the edges.

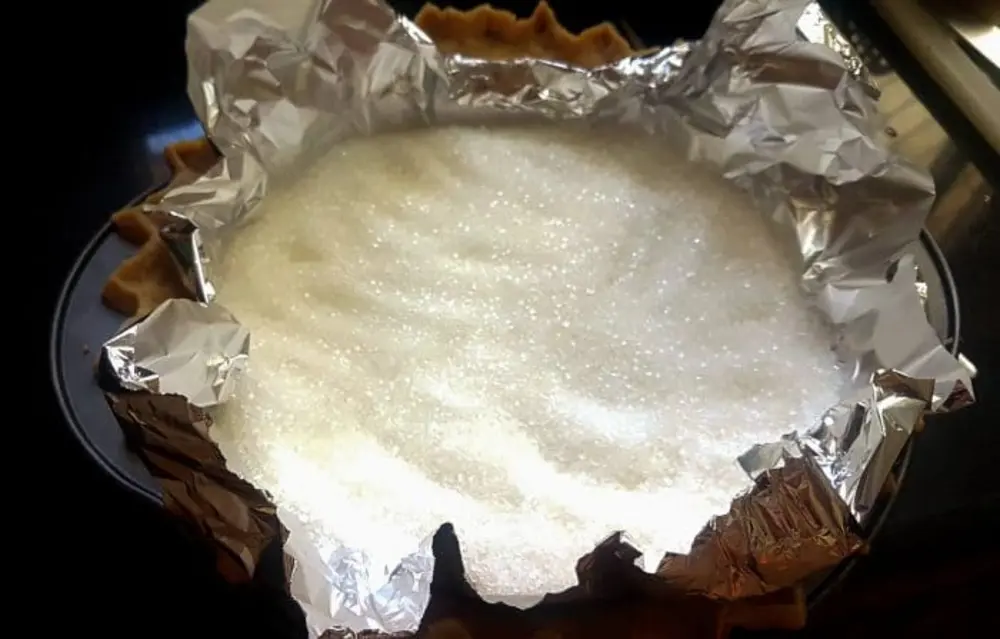
Like everyone else, I used to use dried beans to blind bake my pie shell. This time, I lined the shell with aluminium foil and used sugar to weigh it down. This way was much better since foil can be tucked into corners more easily than parchment, which tends to lift.
Crust chilling in the fridge, I set about making the apple filling. I used cooking apples – Granny Smith, because they’re firm, tart and crisp and hold up well retaining their shape even after baking. Gala, Fuji, Red Delicious and other firm and crisp varieties also work well. As you can see in the pictures, I sliced them slightly thick because I like my pies to have bite (slicing them very thinly can lead to them losing shape when the sugar and heat draw out their juices). These Granny Smiths were cooked enough to be tender without turning squishy. Their inherent sourness and the lemon juice I added, combined with the brown sugar and cinnamon, produce the right balance of sweet and tart. Just the way I like it.
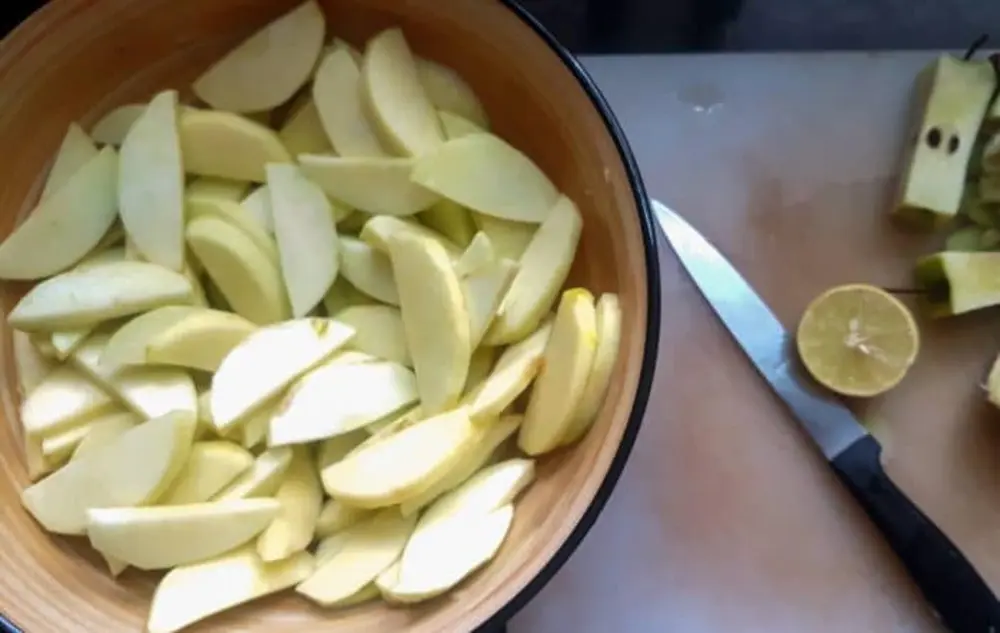
I tossed the apples in brown sugar, a few squeezes of lemon juice and 2 tsps of cornflour (to absorb the extra moisture, thicken the juice and prevent the crust from getting soggy. I allow the apples to sit in their sugar rub for 4-5 minutes to give up their juices. The moisture release at this stage prevents too much liquid accumulate during baking and helps the filling reach the right consistency quickly.
The chilled crust lined with foil and filled with sugar went into the oven for all of 10 short minutes. I then let the shell cool before piling in the filling, and I did pile it (I’m terrible at creating fancy patterns and other fiddly stuff). I drizzled some of the apple-y liquid remaining in the bowl onto the filling, like a glaze. The final baking took about 35-40 minutes at 180℃. Halfway through the baking, I checked in to ensure that the crust hasn’t burned and since my oven has a hot spot, I rotated the pie to ensure even browning.

This apple pie obviously, wasn’t as flaky as a regular flour crust would be but it was tender and buttery without being dry or stodgy. I had a huge slice of it for breakfast one morning and I’m not shy to say that my pie and I had a moment – joy and satisfaction in the delicious experience of sitting quietly and eating pie.

Apple Pie
Ingredients
- 125 g whole wheat flour
- 125 g oatmeal (not too fine)
- 130 g butter, cold, diced
- 5-6 tbsp cold water
For the filling
- 4-5 Granny Smith or other cooking apples, peeled, cored and sliced thickly
- 5-6 tbsp soft brown sugar
- 3 tbsp lemon juice
- 1 tsp cinnamon powder
- 2 tbsp cornflour
For the egg wash
- 1 egg yolk, beaten
- 2 tbsp milk
Instructions
- Put the flours in a large bowl (add a pinch of salt if you're using unsalted butter) and mix with a fork.
- Put the cold cubes of butter in the flour mixture and with your thumbs push the butter to flatten it into the flour. Now add the cold water, about 5 tbsps at first and push the flour against the side to the bowl (adding additional cold water tbsp by tbsp as needed) to gather into a dough ball.
- Place a parchment larger than your pie plate, on the counter and gently roll out the pie dough into a disc larger than the diameter of a 8-inch pie plate (you need enough pastry overhanging to be able to crimp its edges.
- Now place the pie plate upside down on the rolled-out pastry, and holding both ends of the parchment along with the rim of the pie dish, gently flip so that the pastry sits in the dish. Using your fingertips, ease the pastry into the plate and remove the parchment. Crimp or pinch the edges with your fingertips to create a pretty border. Trim any extra pastry.
- Heat the oven to 180°C. Press a sheet of aluminium foil on the unbaked pastry shell, tucking the edges into the sides. Fill the foil with enough sugar to weigh down the pastry shell. Bake for 10 min, remove from the oven, lift out the foil with sugar and cool the shell.
- While the pie shell is cooling, toss the sliced apples with the lemon juice, brown sugar, cinnamon powder and cornflour. Let the apples macerate for 5-7 minutes.
- Arrange the apples in the cooled pie crust and spoon some of the residual liquid on the filling (you can drizzle a little more when the pie is almost done). Beat together the egg yolk and milk and brush the crust with it using a pastry brush. Bake at 190°C for 35-40 mins or till the apples are cooked with just enough glaze-like liquid remaining to keep the pie moist. Remove the pie from the oven, cool for at least 20 minutes before serving.
I had stopped baking apple pies cos of the base issues……tried some options didn’t work.
But this is a great recipe ……though the base was a bit soggy.
But a guilt free pie.
Thanx for sharing it.
Stay safe
Good to know Simi, Next time, blind bake the base for a few minutes more. An underbaked base will absorb the apple juices and get soggy. Also if your apples are very juicy, you may want to increase the cornflour by a bit in the filling in order to bind the juices.